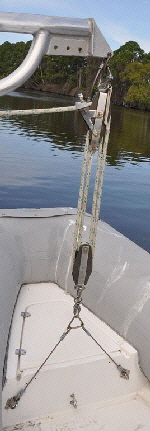
Hauling our inflatable dinghy up eight feet from the water required two people, and even with multi-part tackles it always hurt our hands. It was also interminably slow with the dinghy sometimes swaying wildly on the tackles. It wasn't any better to run the lines to our sheet winches either, because it still meant two people winding and even slower hoisting. So I decided to do something about it.

Winch kitHRI considered mounting a hand operated winch on each davit, but winding the dinghy up evenly still needed two people and the high gearing meant it would have been even slower than pulling the tackles. I had watched people at boat ramps, hauling their boats on trailers using an electric drum winch on the back of their vehicles. I found one of these at Northern Tool Inc., (Superwinch LT2000 Model Model 1220210). It is a 12-volt drum winch rated at 2000 lbs pull with a wired remote up and down button. They also had one with a wireless remote but I liked the direct wire connection with no batteries to go flat when the dinghy was half way up. We are talking about boats after all.

Dinghy outboardHRThis winch now effortlessly hauls my 120 Lb dinghy, and a 55 lbs outboard to the head of the davits in 38 seconds. The ‘down’ button lowers it slightly quicker and both can be operated by a child.

When I tested the new set-up with the outboard still attached to the dinghy the winch never even blinked and I was so astonished and excited the outboard nearly hit the davit. I don't hoist them together when making passage, I clamp the outboard to its bracket on the stern rail. But I often lift them both attached at night at anchor, mainly to prevent theft. It is really that quick and effortless. Judging by the power of this winch I am sure the model I bought should handle almost any size dinghy and outboard.

I made all the modifications myself, using only hand tools that most do it yourself boaters will probably have. It is not as difficult as it might sound reading this article and for my wife and I it is certainly one of my better inventions and a most worthwhile addition to our boat

                                                                                       ITEMS AND TOOLS NEEDED

                                                                     MAKING THE WINDING DRUM DIVIDING COLLAR:

Unlike the single wire line supplied with these type of winches, twin davits require two lifting lines one leading to each arm. These lines wind off the winch drum at right angles then through pulleys to the end of the davits and down to the dinghy lifting attachments. How many pulleys you need depends on how you route the lifting lines.

The lifting line is a continuous rope, but it feeds in opposite directions off and on the winch drum. Therefore, to prevent the lines overlapping and tangling, a divider is needed in the middle of the drum to split it in half.

DividerHRI made this from a 3/8” inch thick piece of aluminum plate large enough to be able to make a circular collar the same diameter as the outside of the winch winding drum. For the my winch the collar is 3 1/2” inches in diameter and it needed to be in two halves to clamp round the winding drum. First I marked the center of the plate then sawed it in half. I used a miter saw fitted with a 10” inch diameter 60 teeth per inch carbide tipped blade. This cuts through aluminum, even 3/8” inch thick like butter, but it could also be done using a hacksaw. The reason I cut the plate in half first was because if I had drilled a hole for the winch shaft while it was in one piece, then sawed it in half, the hole would not have been circular due to the material taken out by the saw cut. The winch winding drum is 1 7/32” inches in diameter, that is, 1/32” inch less than 1 1/4” inches. But other winches will have different diameter drums.

I then clamped the two halves of the plates together and scribed a 1 7/32” inch diameter ring with a compass. Then using a 1 1/8” inch hole cutter in my bench press I carefully cut a hole in the middle of the plate to make the initial hole. I then shaped it to the exact diameter using drum disks on a Dremel tool. Great accuracy can be achieved by repeatedly offering the two halves to the dividing collar together, then grinding a little bit at a time until the two halves meet perfectly between the winch shaft.

The two halves of the dividing collar now need to be fastened to the winch shaft. Unfortunately, the drum on my winch has a steel shaft running through the inside that prevented me bolting the halves of the collar straight though the shaft. It was therefore necessary to fasten each half separately by drilling and tapping a thread into each side of the drum. By clamping each half of the divider collar vertically in my bench press vice I carefully drilled a 3/16” inch hole down the center of each collar to carry the fasteners. These do not have to be symmetrical since each half is held in place separately.

I then held one half collar in place in the middle of the winding drum, and using the 3/16” inch drill as a pilot I made a small indentation in the winding drum. This ensured the thread tapping drill would be dead centered in the hole. I then drilled a 5/32” inch hole into the winding drum and threaded it with a 3/16” tap then bolted the divider half in place using a 1 1/4” inch long machine screw. Then I held the other half of the collar in place and repeated the operation, but before actually bolting the second half collar in place I drilled a 1/4” Inch hole, (the thickness of my lifting line), near the edge of the inside of the collar. This is to allow the lifting line to pass continuously from one side of the collar to the other. I then secured the other half collar to form a completely round divider. This fixed the divider collar in place on the winch shaft. If you feel unable to tap a threaded hole in the winding drum, you can drill a suitable size hole and secure each collar half with a self-tapping screw. In actual use the collar carries hardly any load and just separates the two sides of the lifting lines. It is worthwhile to use a drop of Locktite on these fasteners, to prevent them coming loose over time.

I used 1/4” inch double braided line for my lines and with a breaking strain of over 1400 lbs it is considerably stronger than the weight of my dinghy and the outboard combined. Dinghy weights vary, so if you have a really heavy dinghy with a large outboard, you might also want to use a thicker lifting line than the 1/4” inch braided line I used. The line should first be threaded through the hole in the divider collar until it is equal lengths each side. Then by operating the winch the line will wind itself round both halves of the drum and feed in and out according to the rotation of the winch. It is not necessary to secure the line where it passes through the divider collar because there should always be a few extra turns of line on the drum even when the lines are fully extended and this prevents them slipping.

Dinghy pulleysHRI bolted my winch motor through the deck in the center between both davits, but it doesn't have to be mounted centrally. If it is more convenient to offset the winch it is only necessary to run a longer line on one side of the drum than the other, because both will still wind in and out at the same rate.

The method of routing the line will also vary with different boats and different shaped davits. My installation was very simple. I used 3/16” Inch stainless pop rivets to attach stainless eye straps to my tubular aluminum davits. Then I simply shackled 1/4” inch blocks to these to ensure a clean lead for the lines to the head of the davits.

I now have only a single line leading down to the dinghy in the water below. so it was necessary to weight the lines heavy enough so they self feed off the winch. I drilled out the center hole in two fishing weights, then half hitched one to each lifting line and they easily weighted the lines down.

I then made two short stainless wire strops with thimbles and snap shackles and attached them to the ends of the davits. These are for hooking on the dinghy attachment rings as a second safety measure when the dinghy is fully hoisted. The winch line can then be backed off slightly to take the strain of lines. I also fitted an additional snap shackle on a longer line to the davit supporting the stern of the dinghy. This enables the dinghy to be angled lower, so any rain water runs out the rear scupper drain.

Being open to the elements on the stern of my boat I'm sure the winch would not have looked good for very long, so I built a nice teak box with removable lid to encase it. This has slots in the side for the lifting lines to pass through.

So what if power fails or the winch breaks you ask? It's a fair question and I kept the original blocks and tackles in case of a failure and they can easily be shackled to the davits like before to haul the dinghy up or down by hand. But now my wife and I have one less struggle and the dinghy can now be hoisted effortlessly by one person. The method of wiring  the winch to a power source will also vary between boats, along with the length and thickness of cable needed to connect to a suitable battery and breaker.

So that's another job the wife can do on her own, and it always attracts onlookers and fellow yachtsmen whenever we use it. Apart from the winch, the only material cost was electrical cable, the lifting line, a small aluminum plate, pulleys and eye straps. Total cost, about $250.00, and worth every penny.


Dinghy hoist - header
Back to navigtion
Dinghy winchHR